
Shoot That Box!
Below is a detailed design breakdown and the train of thought in the different parts I made to the game, including game flow/maps, level design, and programming.
01
Game Flow and Maps
Pencil


I drew down the ideas about the game on paper first. This stage only contained the prototype of the characters and the game loop.
Miro Board

The flow chart of the enemy's behaviour recorded how the enemy makes decisions depending on different situations in the game and helped me better program the enemy AI in Unity.
Adobe Photoshop


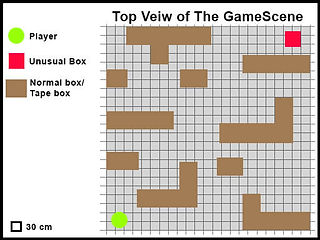
Before building the level in Unity, I made a top-down view map for each level, including the player's and the enemy's positions.
02
Level Design
Unity
The gap between static boxes provides an opportunity to track the enemy's movement and another choice to shoot it without facing.
The lights from the windows add more light sources to the level and help distinguish the direction.

At the very beginning of the level, the random boxes will fall over the floor to affect the movement and increase playability.
While hitting the enemy effectively, the visual effect and audio will appear to give feedback.


From the easy to hard level (left to right), the light gets darker. It represented time flies from morning to night outside the storage. Also, fewer light sources increased the difficulty of chasing and shooting the enemy.
03
Programming
Visual Studio
Unity

There are 6 bullet packages random spawning in the level. You can get 3 more bullets every time picking up the package. The number of packages is controlled by the number of the player's bullets to avoid being no bullet to shoot.

When you hit the enemy accurately, the blue particle effect and audio will play once to show the attack.


Mouse to aim. The target aiming pattern will turn red when you have aimed at the enemy correctly.

The enemy will keep chasing you and try to attack. If it is too close to you, the blood will decrease every second until the distance has been pulled away.